Integrating Soundboard Mixing With Gouache In-Painting
When Gouache Goes Wrong on Bisque
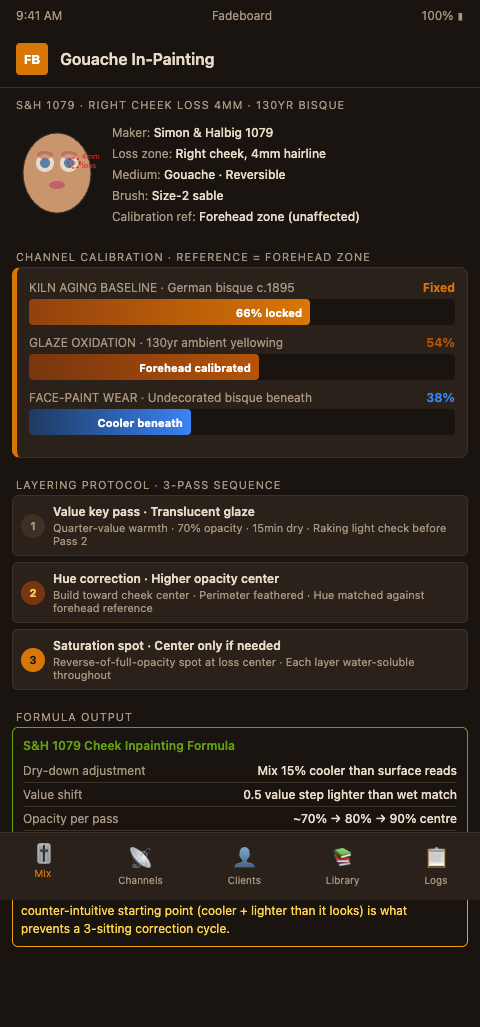
A Simon & Halbig head arrives with a hairline loss on the right cheek, roughly 4mm across — the kind of loss that needs a single controlled inpainting pass, not a full refiring. The restorer mixes what appears to be a perfect ivory-pink under the studio lamp, applies it with a size-2 sable, and steps back to evaluate. The patch is correct. Twenty minutes later, after the gouache dries, it reads two shades too warm and half a value too dark.
This scenario is so common in independent bisque doll restoration that it has its own informal name among working restorers: "the warm drift." Gouache notoriously shifts on drying — it lightens in light colors and darkens in mid-tones, and it always moves warmer on matte, absorbent bisque surfaces. If you mixed to match the wet bisque surface rather than the dry ambient tone, you've already lost.
According to AIC's BPG Inpainting standards, all inpainting must be reversible; gouache's reversibility depends heavily on age, penetration depth, and whether an isolation layer was applied before the touch-up. A warm patch that's soaked into unprotected bisque becomes surprisingly difficult to remove cleanly without disturbing adjacent original paint.
The Cincinnati Art Museum's conservation practice is explicit: retouching should occur only in areas of loss, never over original paint. That constraint makes the stakes of an incorrect first application high. You have one chance to get the formula right before you risk disturbing a surface that survived 130 years of house moves and glass-case storage.
Using Fadeboard to Predict the Formula Before Mixing
Fadeboard does not replace the gouache — it tells you what to mix. The workflow starts not with the palette but with the degradation model: open a session for the specific doll, set the kiln-aging fader to approximate the bisque's original firing characteristics (German bisque versus French bisque have different starting tones due to different clay body compositions), then push the glaze-oxidation fader to represent the ambient yellowing the unaffected cheek surface has accumulated over 130 years.
Think of it as a soundboard with dedicated channels for each aging process. The kiln-aging channel sets your zero point — the tonal foundation of the original bisque as it came from the factory. The glaze-oxidation fader represents atmospheric yellowing and surface carbonation. A face-paint-wear channel tracks how much of the original applied cheek rouge or flesh tint has abraded away, shifting the surface toward the cooler, paler tone of undecorated bisque underneath.
Once those faders are calibrated against the unaffected areas of the same face — the forehead, the brow area, zones that never held applied color — the formula output gives you a starting mixture adjusted for the predicted dry-down behavior on that specific bisque body. For a Simon & Halbig #1079 with typical 130-year glaze oxidation, that output usually places the mixture about 15% cooler and half a value lighter than what looks "right" under wet viewing conditions. That counter-intuitive starting point is precisely what prevents the warm drift.
The AIC Painting Conservation Catalog Vol. 3 identifies the techniques that most reliably integrate with matte bisque surfaces: pointillism and feathering for blending losses at the perimeter of the inpainting zone. Both of these techniques rely on building color in transparent layers rather than applying an opaque match — which means your Fadeboard formula, adjusted for the dry-down shift, should be mixed at about 70% of full opacity for each successive layer rather than one saturated stroke.
Layering Protocol for Bisque Inpainting
The layering sequence matters as much as the formula. Start with the lightest application — essentially a translucent tinted glaze that warms the bisque surface by a quarter value. Let it dry completely (minimum 15 minutes under ambient conditions; longer if humidity is above 60%). Evaluate under raking light for coverage and edge integration. Then apply a second layer at slightly higher opacity, concentrating on the center of the loss rather than the perimeter.
The PMG Inpainting standards at AIC describe gouache application methods for small, controlled losses with exactly this sequence: the first layer establishes the value key; the second layer corrects hue; a third spot application, if needed, addresses saturation in the center of the loss. Reversibility is maintained at each stage because each layer remains water-soluble until the next isolation step.
Gamblin's research into conservation retouching materials found that Laropal A81-based conservation colors — developed with 25+ conservators and tested to remain soluble after 3,000 hours of aging — outperform raw gouache in long-term reversibility, though they require a different solvent (petroleum distillates) than gouache's simple water solubility. For independent restorers without solvent control infrastructure, gouache remains the practical choice; the key is keeping layers thin enough that water solubility is preserved throughout the painted stack.
For cheek highlight inpainting specifically — the small catch-light zones above the main cheek blush — the approach shifts from the area-fill methods described here toward a pointillist spotting technique. The workflow for bisque cheek highlights and inpainting covers that in detail, including how to calibrate the highlight brightness against the doll's original factory finish rather than the ambient restored surface.
Edge Integration: The Part Restorers Rush
The most common failure mode in gouache bisque inpainting is not the color match — it is the edge. Gouache applied to a discrete loss zone leaves a perceptible boundary when it dries: a slight ridge from the paint film building up at the edge, or a tonal step where the painted surface transitions to original bisque. Both artifacts are visible in raking light and will flag the restoration under any professional appraisal.
The solution is pre-blending the inpainting boundary. Before applying any inpainting medium, lightly buffer the edge of the loss with a barely damp sable — no pigment, just enough moisture to slightly swell the bisque surface micro-texture at the boundary. This softens the edge's absorption profile so the first inpainting layer feathers naturally rather than pooling. The technique requires practice on spare bisque shards before using it on client dolls.
For an egg tempera versus casein comparison — particularly relevant if you're deciding whether to switch from gouache entirely for French bisque work — the egg tempera vs. casein facial restoration post covers the binder behavior differences in detail. Vestment conservators working with silk dye integration face structurally parallel problems with medium-surface compatibility: the silk dye soundboard integration workflow documents how dye behavior on silk parallels gouache behavior on bisque, with useful crossover tactics for managing saturation shift.
The Test That Saves the Restoration
One test before the brush touches the doll: paint your Fadeboard formula onto Bristol card, let it dry for 30 minutes, then hold it flush against the unaffected cheek surface in the same light you'll be using for final evaluation. If it matches, proceed. If it reads off, adjust the glaze-oxidation fader by 5% and re-swatch. The entire calibration cycle — swatch, dry, evaluate, adjust — takes under 45 minutes and eliminates the three-sitting correction cycle that costs you a second client appointment and risks pushing the original paint beyond its tolerance.
If you have a Jumeau or Bru Jeune with a cheek loss sitting on your workbench right now, open a Fadeboard session before mixing anything — calibrate the oxidation channel against the untouched forehead zone, read the cool-adjusted formula, and swatch on Bristol card. One correct mixing session, not three correction sittings.