How to Document a Quilt's Fade Pattern Before Work Begins
What Is at Stake in Pre-Treatment Documentation
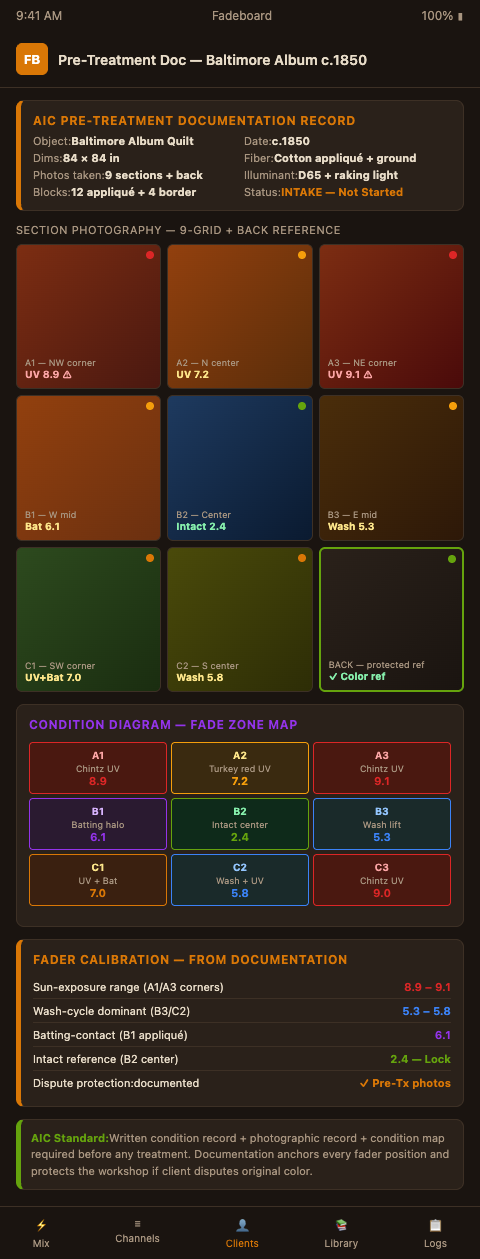
A workshop specialist received a disputed piece: a Baltimore Album quilt, circa 1850, brought in by a family member who claimed the previous restorer had "changed the color" of three appliqué panels. The previous restorer insisted the panels had been correctly matched to the observed fade state at intake. Neither party had photographic documentation of the quilt's condition before the restoration began. The dispute could not be resolved.
This scenario is not uncommon in high-value quilt restoration. QuiltHistory.com's restoration practice standards list pre-restoration documentation — condition assessment, photographic record, and repair plan — as the first required professional step. When that documentation is absent, any disagreement about original condition becomes unresolvable.
Beyond the legal protection function, pre-treatment documentation is the technical foundation of accurate restoration. You cannot set the correct wash-cycle fader position for a block unless you have a clear record of that block's color before you touched it. You cannot evaluate whether your finished result matches the target unless you established the target precisely at intake.
The AIC Standard for Textile Documentation
AIC Textile Specialty Group standards for pre-treatment documentation require written and photographic records before and after any treatment, with condition maps identifying fade zones as a required component. These standards were developed for museum collections, but they represent the appropriate baseline for any restoration of an heirloom quilt with historical or monetary value.
The AIC mandates written identification records (object description, dimensions, fiber content, approximate date, owner information), condition records (damage type, location, and extent), and photographic records taken at consistent, documented settings. The condition record should be completed before the photographic session, because examining the quilt closely for the written description reveals details — stitch-line halos, hidden seam-allowance references, back-of-quilt color evidence — that should be captured photographically.
AMNH condition reporting workflow adds the requirement for precise damage location description: not "faded in the upper area" but "panels A1 through A4 (upper-left quadrant) show UV bleaching with color reduction estimated at 60–70% from seam-allowance reference color." That specificity is what makes the documentation useful rather than merely present.
The Photographic Protocol
The photographic sequence for a quilt pre-treatment record follows the Smithsonian standard: ambient photography of the full face, raking-light photography of the full face, and UV-fluorescence photography if available. For each section of a large quilt, repeat the ambient sequence.
Smithsonian textile photography guidance specifies that the ID label, date, illumination type, and exposure settings should be recorded for each shot. The illumination type matters because different light sources reveal different information: ambient photography shows the overall fade state, raking light reveals surface texture changes from fiber damage, and UV photography shows where original colorants remain versus where chromophore breakdown is total.
Library of Congress photodocumentation workflow uses a three-mode capture approach — normal, UV-fluorescence, and reflected infrared — that can distinguish faded colorants from degraded colorants even when they look identical under ambient light. UV-fluorescence in particular reveals whether a pale area still contains chromophore material (it will fluoresce) or has lost all colorant (it will appear dark). For workshop practitioners without infrared capability, the UV-fluorescence mode is the most diagnostically useful addition to an ambient-only protocol.
The minimum photographic sequence for an heirloom quilt documentation record is: one full-face ambient shot with color reference card, one full-face raking-light shot, section-by-section ambient shots for quilts over 60 inches, and close-up shots of representative damage examples for each damage type identified in the written condition record. At least one close-up of the back of the quilt, showing the protected-color reference, is also required.
Translating the Documentation Into Fader Calibration
With the written condition record and photographic set complete, the Fadeboard workspace setup proceeds from the documentation rather than from fresh observation. This is the correct sequence: document first, then calibrate. If you calibrate from live observation alone, you will be influenced by the overall appearance of the quilt at the moment of examination — if the lighting is warm, the reds will look deeper than they are; if the room is cold and blue-tinted, the indigo may look lighter. The photograph taken under controlled, documented conditions is the neutral reference.
For each panel in the zone map, review the corresponding photographs and assign fader positions based on the documented condition. Use the close-up comparison shots — the back-of-quilt reference against the panel face — to establish the delta that defines the sun-exposure and wash-cycle fader settings. Use the stitch-line halo photographs to set the batting-contact fader.
Pre-treatment examination requirements from MACC confirm that the examination report must describe the overall state and nature/location of damage before work starts — not during or after. The Fadeboard fader-calibration step belongs in the intake session, not the first dyeing session.
The Condition Diagram
In addition to photographs and written notes, a condition diagram — a schematic drawing of the quilt face with damage zones marked as shaded regions — is standard professional documentation. Example condition reports with damage diagrams show fade zones mapped as graduated shading on a line drawing of the quilt layout.
For workshop practitioners, the condition diagram serves as the most portable and legible reference during the restoration work itself. The photographs are essential for calibration and archiving, but when you are standing at the dye bath and need to know whether panel C3 has a higher or lower wash-cycle fader setting than panel B2, a clearly annotated diagram gives you that answer at a glance.
Fadeboard's panel-indexed recipe system is designed to integrate with this diagram: the panel labels on the diagram correspond directly to the channel strip labels in the workspace. If your diagram labels the upper-left corner panel as A1, the Fadeboard channel strip for that panel carries the same label, and the connection between the photographic evidence and the dye bath recipe is explicit and traceable.
For tracking dye decisions across multi-month restoration projects, the pre-treatment documentation record is the anchor point — every subsequent decision is recorded as a delta from the baseline condition established in the intake record.
Transferring the Record for Apprentice Work
A detailed pre-treatment documentation record is also the critical input for an apprentice handoff. Shade drift between shift changes is one of the most common quality problems in workshop quilt restoration, and it often originates in imprecise documentation — an apprentice working from a verbal description of "the madder should be a medium dusty rose" produces a different result than an apprentice working from a condition diagram with fader positions, photographic references, and a panel-indexed target color for each block.
When handing off a Baltimore Album or multi-yard Amish solid-color quilt to a workshop apprentice, the pre-treatment documentation record and the Fadeboard workspace together constitute a complete technical brief. The apprentice does not need to re-examine the quilt to understand what is required for each panel — the documentation answers that question in full.
For quilt dye reference building from surviving corners, the pre-treatment documentation is the legal and technical record that establishes those corner colors as the authoritative baseline — not the practitioner's memory of what the corners looked like at intake.
For practitioners who also work on ecclesiastical textiles, documenting vestment original liturgical hue before any intervention follows an equivalent protocol, adapted for the different physical characteristics of silk-ground and brocaded vestment pieces.
Building the Client-Facing Record
The pre-treatment documentation record has a client-facing component as well as a technical one. Present the condition diagram and the key photographs to the client at the end of the intake session. Walk them through the fade zone map and explain what each zone indicates about the quilt's history. Show them the seam-allowance reference colors and the block-face colors side by side — the visual gap between them often surprises clients who have lived with the quilt for years and have lost perspective on how faded it has become.
This client conversation sets accurate expectations for the restoration result, prevents disputes about whether the post-treatment color is "too different" from what the client remembers, and creates a shared understanding of why panel-indexed pricing reflects the actual complexity of the work. Clients who see their quilt's fade documented in detail before you touch it are far more likely to trust your judgment throughout the restoration.
Workshops that want to move pre-treatment documentation from an informal checklist to a structured, AIC-compliant record should join the Fadeboard waitlist — the intake templates are calibrated to the four-component condition assessment framework described here. Book a walkthrough using a piece from your current intake and we will build the first zone map together.