Kicking Off Fade Mapping on a 19th-Century Quilt
Before the First Photograph: What You're Looking For
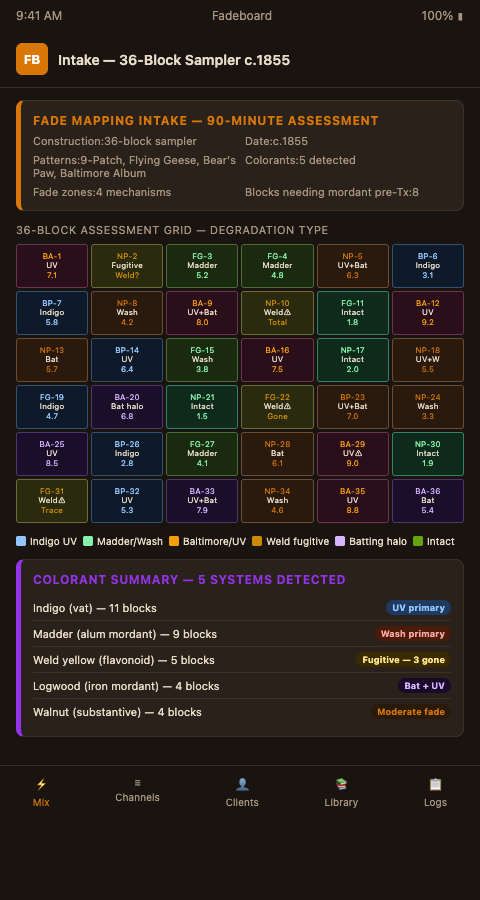
A workshop specialist received a 90-inch sampler quilt, circa 1855, with 36 distinct blocks in assorted patterns: Nine-Patch, Flying Geese, Bear's Paw, and two Baltimore Album-style appliqué center panels. The client believed it was "just faded." The specialist's first 20 minutes of examination revealed something more complex: the appliqué panels had indigo blue that had shifted to a blue-gray from UV exposure; the Flying Geese blocks had madder red that was deeper at the seam allowances than in the block faces; the weld yellow triangles in the border were nearly gone; and one corner Nine-Patch section had localized pale zones at the quilting stitch lines consistent with batting-contact dye loss.
"Just faded" was four different degradation processes operating on five different colorants at varying intensities across 36 blocks.
The 18th- and 19th-century natural dye palette used on American quilts included madder, indigo, logwood, weld, walnut brown, and cochineal as the primary colorants — each with a distinct fade signature. Madder reds shift toward orange-brown as purpurin (a less lightfast anthraquinone component) degrades faster than alizarin. Indigo blues bleach progressively from deep slate toward powder blue and eventually near-white. Weld yellows, being flavonoid-based, are among the least lightfast colorants in the 19th-century palette and may disappear entirely before other colors show significant fade.
Recognizing these signatures at the start of the assessment tells you what fader channels you need and, roughly, where each one sits before you have measured anything precisely.
The Condition Assessment Framework
Getty Conservation Institute condition assessment protocols require four components for a rigorous pre-treatment assessment: description of the object, identification of damage locations, characterization of damage extent, and conservation recommendations. For a 19th-century quilt, each of these translates directly into inputs for the Fadeboard panel-indexed system.
Description means recording the block layout, construction method (piecework vs. appliqué vs. whole cloth), fiber content (cotton, wool, silk, or mixed), and approximate date. Construction method matters because appliqué panels typically have areas of protected color under the appliquéd shapes that can serve as reference points — the backing cotton under an appliquéd chintz rose retains more original color than the exposed rose face.
Damage location means the zone map — the grid-based documentation of where each type of degradation has occurred. At this stage you are noting which panels show UV bleaching gradients, which show batting-contact halos, which show wash-cycle uniform lightening, and which appear relatively intact. You are not yet measuring concentrations or setting fader positions — you are establishing the spatial inventory.
Damage extent means the severity rating for each zone. A three-point scale (light, moderate, severe) is sufficient for the initial assessment. More precise calibration happens at the fader-setting stage.
Conservation recommendations, at this stage, mean noting which panels require mordant pre-treatment before redyeing (if batting-contact loss has disrupted the fiber-mordant structure) and which panels have fugitive-dye areas where the original colorant is entirely absent and the restoration is reconstructive rather than corrective.
Documentation of antique American quilt color sequences confirms that indigo was typically the last color standing in severely faded period quilts — meaning that if you encounter a quilt where the indigo looks intact but all other colors are nearly gone, the piece has experienced very high-intensity fade exposure overall, not just mild aging.
The Smithsonian Standard and What It Means in Practice
The Smithsonian Institution maintains over 500 quilts in its national collection, managed under strict climate-controlled storage and pre-treatment documentation protocols. The pre-treatment photographic record they require — ambient, raking, and UV photography before any intervention — sets the industry benchmark. For a workshop practitioner, the equivalent is: ambient photographs of the full quilt and each section, close-up photographs of representative damage examples in each zone, and back-of-quilt photographs showing the protected color references.
The raking-light step is worth particular attention. Under raking light angled across the quilt surface, areas of surface fiber loss — which often accompany severe batting-contact damage — appear as texture changes. The pile of the damaged areas is different from the undamaged areas. If you see texture variation in raking light that does not correspond to the piecing or appliqué design, you are looking at mechanical surface damage that will affect how the corrective dye takes.
Setting Up the Fadeboard Workspace
With the condition assessment complete and photographs taken, the Fadeboard workspace setup proceeds block by block. Create a channel strip for each panel, numbered to match your zone map. For each strip, assign starting fader positions based on your damage extent ratings: light fade gets positions 2–3, moderate gets 4–6, severe gets 7–9 on each relevant channel.
Set the sun-exposure fader based on the UV bleaching assessment — gradient pattern, proximity to the window-adjacent edge of the quilt, and the severity of the color shift from original toward bleached. Set the wash-cycle fader based on the overall color lift and pattern-detail loss. Set the batting-contact fader based on the stitch-line halo assessment. If a block has only one type of degradation active, only one fader is elevated; if all three are active, all three faders are set independently for that block.
Conservation of textiles frameworks emphasize that fade mapping is a prerequisite to any stabilization treatment — not an optional documentation step, but the foundational analysis that makes targeted intervention possible rather than speculative.
For natural-light calibration of the Fadeboard workspace, the lighting conditions during the initial fade assessment matter — what reads as "moderate" fade under incandescent studio light may read as "light" under UV-filtered daylight. That post covers how to standardize your assessment conditions for consistent fader calibration.
The Block-by-Block Walkthrough
With the workspace set up, the final step of the intake session is a block-by-block walkthrough that refines the initial fader estimates. Go to each panel in the zone map and compare the observed fade against the reference color you have established from protected areas — seam allowances, back-of-quilt, unexposed binding. Note any discrepancies between your initial damage-extent rating and the precise fade you see at close range.
Pay particular attention to blocks at the quilt's geometric center. These are often the most evenly faded — they have experienced average UV exposure, average wash-cycle exposure, and average batting contact. If you find a center block that reads as deeply faded despite those average conditions, that is a signal that the original dye was a fugitive colorant — the pale appearance is not primarily degradation but original low lightfastness.
The National Quilt Museum's conservation workflow begins with written examination and photographic records before any treatment. Following that sequence — assessment, photography, fader calibration, then bath mixing — ensures that every dye decision is grounded in evidence from the specific quilt rather than in general assumptions about period fade behavior.
The completed intake assessment and Fadeboard workspace setup, done properly, takes 90 minutes to three hours depending on quilt complexity. That investment pays dividends throughout the restoration: every subsequent bath is mixed to a specific panel's requirements, and the panel-indexed recipe serves as the handoff document for any apprentice or workshop colleague who continues work in a later session.
For quilt fade documentation protocols before work begins, the intake assessment described here feeds directly into the formal pre-treatment record — a structured document that clients increasingly expect and that insurance appraisers require for high-value restorations.
Practitioners working on vestment restorations alongside quilt projects will find that the parish chasuble beginner's workflow for color work covers the same foundational assessment approach adapted for silk-ground liturgical pieces, with parallel lessons about identifying degradation mechanisms before setting fader positions.
After the Intake: Setting Expectations With Clients
The fade-mapping intake session produces a document that serves two purposes: it is the technical foundation for the restoration, and it is the client communication tool that explains why the work is complex and why panel-indexed pricing reflects the actual scope.
Show the client the zone map and the fader position grid for their quilt. Explain that the 36-block sampler quilt requires not one dye bath but nine separate formulations for the indigo channel alone, because the nine different indigo states in those blocks each need a different concentration to read as coherent when the piece is displayed. This conversation, grounded in the specific evidence from their quilt, builds client confidence and sets accurate expectations for both the cost and the timeline of the work.
Get started with Fadeboard's structured intake templates by joining the waitlist — open to quilt workshops now. Bring any 19th-century multi-block sampler from your current intake, and the block-by-block fader setup will be the first thing we build together.