How to Document Original Pigment Before Any Touch-Up
What You Lose Without Pre-Treatment Records
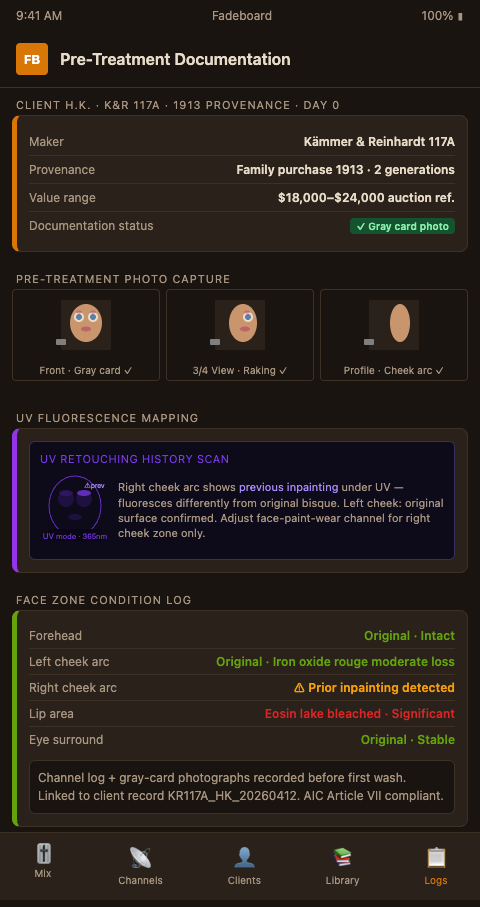
A Kämmer & Reinhardt 117A character face arrives at your studio. The provenance audit trail goes back to the original family purchase in 1913. The client has photographs from 1935 and 1968 showing the doll in family settings. You have eleven days to restore the cheek and lip pigment.
You do the face work, return the doll, and six months later a family member challenges the color — they believe the cheek was warmer before your intervention. You have no pre-treatment documentation. The 1935 photograph is ambiguous because of the printing process. You cannot prove what you found or what you changed.
This scenario is common enough that Chronicle Collectibles' antique doll valuation reference explicitly notes that pre-treatment pigment documentation supports auction valuation — and that German K&R character dolls can reach $20,000 or more at auction. At those values, the absence of documentation is not just professionally embarrassing; it is a liability.
The AIC Guide to Digital Photography and Conservation Documentation is the foundational professional standard: pre-treatment, during-treatment, and post-treatment photography are each required components of a complete conservation record.
What to Capture and How
Gray card + calibrated white balance, always. The Library of Congress digital imaging workflow specifies: calibrated camera, 18% gray card white balance, color chart capture before each session. For independent restorers on kitchen workbenches, "calibrated camera" means any modern smartphone with manual white balance set against a physical gray card. The gray card anchors the color information in the photograph to a known reference. Without it, every pre-treatment photograph is an impressionistic record rather than a measurement.
Capture in three orientations. Front, 3/4, and profile. Front captures overall face balance and lip/cheek tone relationship. The 3/4 view captures raking-light shadows that reveal texture and surface condition the flat-front view misses. Profile captures the cheek arc in full — the zone where glaze oxidation and UV darkening most often concentrate — and the chin and neck junction, which frequently shows storage-contact staining.
Note the lighting setup. The research on color accuracy in technical photography documents that Metamorfoze and FADGI standards require ColorChecker SG charts for professional conservation photography, partly because even small lighting changes produce measurable color shifts. For independent restorers, the minimum is a written note with each image set: lamp type (daylight, incandescent, LED), distance, and whether the gray card reading was set manually or automatically.
Use UV fluorescence to map retouching history. UV fluorescence photography reveals previous inpainting and retouching by contrast with the original bisque surface, which fluoresces differently than subsequent paint layers. A UV image of the face before any intervention tells you whether the "original" pigment you see is actually original or whether a previous restorer has already touched the cheeks or lips. This changes which channel settings are appropriate in Fadeboard: a previously retouched area may have faded from the restoration point, not from the factory original.
Document the PMG way. The PMG Examination and Documentation standard recommends multi-mode imaging — UV fluorescence, reflected infrared, raking light — combined with written condition notes that record the location, size, and character of every observed condition issue. For a bisque doll head, the written record should cover: overall flesh tone, cheek rouge zone condition, lip paint condition, eye socket paint condition, any crazing or firing marks in bisque, and any previous repair evidence.
Fadeboard's role in the documentation process is to attach channel settings to the photographic record. Your pre-treatment photograph captures what is there. Your Fadeboard channel log captures why it looks that way — which degradation mechanisms are active, at what level, and what they predict about the original factory color. The two records together are what makes a restoration auditable rather than merely photogenic.
Building a swatch library from single-client work is the downstream habit that pre-treatment documentation enables. Once you have a properly documented pre-treatment state, your Bristol card swatches for that client become permanent reference material tied to a specific documented condition — not orphaned color chips that drift from their context over time.
The Forbes Pigment Reference Collection at the Library of Congress uses a database of 2,500 reference pigment samples to identify unknowns. Independent restorers cannot replicate that infrastructure, but the LOC approach confirms the principle: identification against a reference before intervention is the standard. Your photographic record and Fadeboard channel log are the independent restorer's equivalent of that reference.
Advanced Tactics for Pre-Treatment Documentation
Photograph the same zone before and after a test wash. The test wash itself is a treatment step. Document the pre-test-wash state with the same gray card setup you used for the initial record. If the test wash shifts the underlying tone, you need to know that before you commit to a full wash — and the before/after photograph pair tells you what happened. On a K&R 117A bisque head, a single dilute test wash over the cheek arc can move the apparent tone by as much as 4 ΔE units because the matte bisque surface absorbs the first wash more aggressively than subsequent passes — a shift that is predictable if you document the pre-wash state, and catastrophic if you don't.
Archive files with client identifier and date, not description. Folder names like "KR117A_ClientSmith_20260410_pretreatment" are searchable and sortable. Folder names like "doll with pink dress" are not. This matters in year three of your studio operation when you have forty clients in archive and need to find the K&R cheek reference for a new K&R client.
Attach documentation to the invoice. Clients who receive a photographic pre-treatment record with their invoice report significantly higher satisfaction than those who receive the doll without documentation. More practically, attaching the record converts your professional documentation habit into a client-visible service differentiator. For clients whose dolls have insurance riders — increasingly common for pieces valued above $5,000 — the pre-treatment photographs and channel log are documents the insurer may require to process any future claim.
Calibrate across multiple photographic devices. Many solo restorers photograph with their phone's rear camera and then reference the images on the same device. The phone's in-built display calibration will attempt to render colors "pleasingly" rather than accurately — a common proprietary processing behavior that can introduce a 5–8% warm bias in bisque photographs taken under mixed light. Export images and view them in a neutrally calibrated viewer (or on a monitor calibrated with a hardware colorimeter) before relying on them for channel-setting reference. The gray card in frame anchors the color data, but only if you're viewing the image under conditions that render the gray card as neutral.
Common pitfall: photographing after surface cleaning. Many restorers clean the surface lightly before photographing to "get a cleaner baseline." Surface cleaning — even with distilled water and a cotton swab — can alter the apparent pigment distribution at the surface, particularly on areas with loose, powdery bisque paint. The correct sequence is photograph first, clean later, and then photograph again to document the change cleaning produced. If cleaning noticeably changes the apparent tone, that shift is itself useful information for channel setting.
Your decision tracking for two-week restoration timelines depends on a solid pre-treatment record: when you review channel settings on day seven to decide whether to proceed with a second wash, you need the day-one photograph to evaluate whether the current state has drifted from your target.
For broader documentation practice across restoration media, the approach to quilt fade documentation before any repair work follows the same multi-mode, gray-card-anchored protocol — the standard is the same regardless of whether the substrate is bisque or 19th-century cotton.
Documentation Before the First Drop of Pigment
Independent doll restorers handling heirloom bisque under eleven-day deadlines cannot afford the time documentation takes — until a client dispute makes clear they cannot afford its absence. Fadeboard's channel log converts your pre-treatment photographic record from a folder of images into an auditable history: each channel setting traces back to a documented condition state, and every mixing decision is grounded in that record.
The Fadeboard waitlist is open for independent restorers now. If you currently manage pre-treatment documentation as a freeform photograph collection with no connection to your mixing notes, that is the specific gap Fadeboard's channel log closes. Join and note whether client disputes over original color have affected your studio in the past — that context will help shape the provenance audit trail features in the early-access build.
A single dated channel log entry per client, taken before any pigment touches the doll, is the smallest workflow change with the largest downstream effect on dispute defensibility. The same record that protects you from a five-year-later claim about cheek color also doubles as the reference baseline for the next bisque restoration you take on from a similar maker — every well-documented intake makes the next intake faster, and a year of disciplined records turns a solo studio into a research archive that future appraisers and conservators can read without you in the room.