7 Microclimate Sensor Placement Rules for Terraced Apple Rows
When 66 Sensors Still Miss the Call
A 10-acre Washington Gala block ran 66 sensors one season and still failed to catch the frost event that cost the orchard five bins per acre, as documented in Good Fruit Grower's reporting on sensor overload. Density did not solve the problem. The sensors were placed by instinct — some at easy-to-reach posts near access roads, some clustered around the irrigation controller, a few at the highest point because that seemed prudent. None were placed using a rule set tied to the terrace geometry, and that was why the network missed.
Terraced apple rows create placement problems that flat-orchard sensor guides do not address. Each bench is a distinct microclimate with its own cold-air behavior, drainage path, sun exposure, and wind channel. Place a probe at bench center and you miss the sink at the downhill edge where cold air pools against the next bench's retaining wall. Place probes at each bench edge and you miss the wind channel cutting down the fall line between rows. Industry research published in Nature Scientific Reports on IoT sensor surveys in precision agriculture confirms that placement discipline — not count — drives whether the data is actionable.
The seven rules below come from the intersection of that research with what mountain orchardists actually pay for when a sensor call was wrong. Each rule names a specific decision the sensor is supposed to change. If a probe cannot be tied back to a decision, it is a data graveyard candidate.
Seven Rules That Turn Probes Into a Helm Display
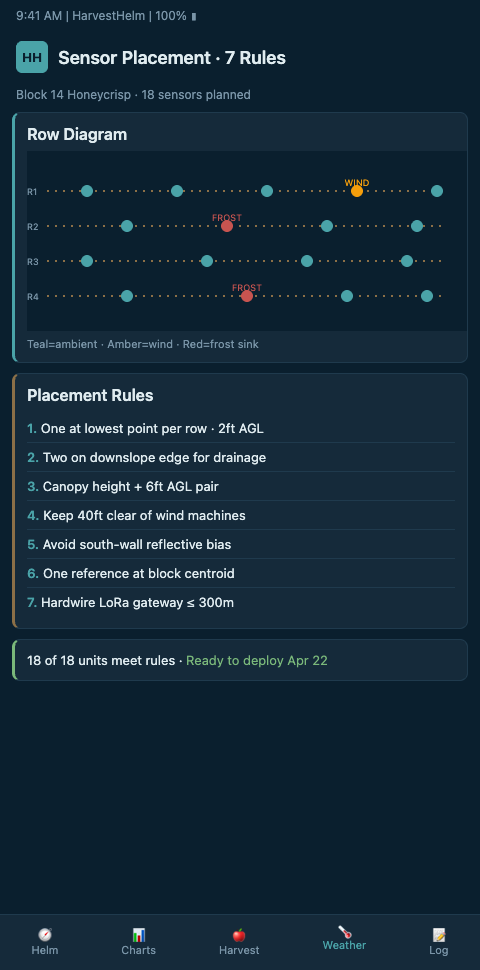
A yacht does not carry dozens of redundant wind sensors on one side of the mast. It carries a small number of well-placed instruments feeding one helm display — and every instrument earns its spot by answering a specific navigation question. The same logic creates a helm-charted yield forecast from terrace probes. HarvestHelm builds the sensor plan this way, and you can replicate the method without our hardware.
Rule 1: One probe per cold-air discharge path, placed at the sink floor. Cold air drains off each terrace in predictable corridors shaped by retaining walls, berms, and row gaps. The Penn State monitoring soil moisture guidance for apple orchards emphasizes placement in representative locations matching drainage conditions — and the frost-probe version of that rule puts one sensor at the bottom of each discharge path so you see when cold air actually pools, not when it is passing through.
Rule 2: One paired reference probe 12-20 feet upslope of each sink probe. The pair lets you compute the inversion delta during calm radiation nights, which is what tells you whether a frost forecast alert matters for that block. Without the pair, the sink probe reads alarming numbers every calm night without telling you whether the condition is worse than usual.
Rule 3: Place canopy-height probes at 1.5 m in the fruiting zone — not at ambient-station height of 2 m or higher. The buds experience canopy-height temperature. The WSU Smart Apple Orchard testbed runs micro-tensiometers at 8 and 24 inch depths with weather stations both inside and outside the canopy to capture that difference. Match your placement to where fruit forms, not where a stake is convenient.
Rule 4: Put one probe per 2.5 acres on uniform ground, one per 1 acre on broken terrain. Research summarized in MDPI's study of hexagonal wireless sensor network deployment shows adaptive density reduces coverage gaps in precision agriculture without burning budget on uniform acres. Match density to variance, not to total area.
Rule 5: Install one "reference" probe outside the orchard at a clearing upwind of the prevailing cold-air flow. This is your regional calibration point. When the reference and the sink probe diverge, you know the terrace itself is driving the event — not regional weather.
Rule 6: Tag every probe with its role on install day. Sink, edge, canopy, reference, wind-exposed. Role tagging is what lets your dashboard treat a sink-probe reading differently from a canopy-probe reading when an alert fires. Without role tags, a data storm on a radiation-frost night produces noise instead of a single actionable signal.
Rule 7: Pair the frost network with a soil-moisture layer. The Digital Matter IoT deployment guide emphasizes that placement must account for farm layout, power, and connectivity — and a frost probe adjacent to a soil probe gives you the stress picture, not just the temperature. Root-zone dry stress before a frost event amplifies damage; your dashboard should show both. The cold-air IoT probes walkthrough covers how to integrate probes into a drainage map once placement is fixed.
These seven rules combine to produce what we mean by a helm-charted yield forecast. The sensor grid is not a passive monitoring system — it is an active navigation chart. Each probe's role-tag maps to a decision type (advisory, action, critical). Each pair-probe delta maps to an inversion-strength reading. Each canopy probe maps to a bud-stage forecast. The grower sees one dashboard that reads like a yacht helm display: status at a glance, detail on demand, decision points highlighted. HarvestHelm assembles that display specifically for mountain terraced orchards.
Avoiding the Data Graveyard at Scale
At 40 acres, these seven rules produce roughly 20-30 probes — well below the 66-probe count that still missed the call. Density is not the point; placement is. But scaling to multi-block orchards introduces new problems. Commercial systems like the Onset orchard and vineyard monitoring platform show how station layout and placement density decisions compound when you stitch together parcels with different drainage signatures.
The most common scaling mistake is cloning a working block's probe layout to a new block. Aspect, drainage, row orientation, and bench geometry differ enough between blocks that cloned layouts almost always miss one discharge path. Re-run the seven rules for each block. The second mistake is keeping probes installed after they stop changing decisions. A reference probe that never diverges from another reference probe is telling you the two are redundant — move one.
Third mistake: ignoring cultivar variance in placement density. A Honeycrisp block needs finer canopy-level probe coverage than a Fuji block because Honeycrisp reacts to temperature excursions more dramatically during dormancy and post-bloom. The cultivar sensor strategy walkthrough covers how Gala and Fuji's different frost-risk profiles should shape sensor count. Growers facing parallel placement problems on other terrains — especially hyperlocal sensor placements in date palm groves — face the same role-tag discipline challenge: every sensor needs to answer a named question or it is a data graveyard candidate.
HarvestHelm installs probes by these seven rules and takes a kilo-cut only after packhouse tonnage clears, so growers are not paying for probes that never change a decision. The economics push us to place sensors where they actually move a yield number.
A fourth advanced tactic: validate the network against an actual frost event before you trust the dashboard for critical calls. The first season, let the probes log through two or three frost events without relying on the dashboard as the primary trigger. Keep using your existing frost-protection judgment. Then compare the probe record to the observed damage pattern. Where the two agree, the network is earning trust. Where they disagree, investigate before the next season — either the probe placement missed the discharge path, or the threshold logic needs tuning, or the damage observation itself was incomplete. Validation is the step most growers skip, and it is the most valuable step.
A fifth consideration: power and connectivity redundancy. A network that goes dark on a frost night is worse than no network at all — because crews trust the dashboard and miss the visual cues they would have read without it. Spec battery backup for every probe, cellular fallback for every gateway, and a dashboard alert that fires when any probe drops out. Mountain terrain creates connectivity gaps that flat orchards do not face. Plan for them.
A sixth rule applied after install: log every sensor alert and every actual damage observation into a shared record. The record becomes the training data for threshold tuning. After two seasons, you will see which probes consistently under-called, which over-called, and which were perfectly calibrated. Tune from the record, not from intuition. Growers who ignore this step stay stuck with whatever threshold set the installer chose on day one.
Build the Sensor Plan You Actually Use
Block-level apple growers running terraced Honeycrisp and Gala on retaining-wall benches are the hardest orchards to sensor correctly — and the most expensive to sensor wrong. HarvestHelm is taking on a limited batch of terraced-row installs this season with the seven rules baked in. We walk the benches with you, tag each probe by role, set up the reference pair per discharge path, and bring the whole layout onto your helm display before bud break — with no upfront cost and a kilo-cut only after your terraced bins clear. Terraced-install slots include a pre-install walk where each retaining wall's dam signature is logged against the bench it protects or worsens, so every sink probe ties back to a specific wall section instead of a generic low point.
Day-one dashboard output shows your 20 to 30 probes color-coded by role tag, with the advisory, action, and critical thresholds pre-set to the first-season defaults and ready for tuning after two frost events. Pilots signing before December get a shared log tool for crew frost-response actions, so the wind-machine operators, sprinkler leads, and packhouse supervisor all write into the same record that becomes your second-season threshold training data. Contracts explicitly exclude any probe that fails to move a named decision after one full season — HarvestHelm removes those probes at no charge, since the kilo-cut only triggers on cleared Honeycrisp and Gala tonnage and a data-graveyard probe costs us before it costs you.